... that a teacher goes through. Wake up with a head ache and realize you're out of Advil. Overhear boys in one of your favorite classes talking about how much cooler their past art teachers have been*. Realize you forgot your lunch on the kitchen table.** Try out a new lesson you are soooo excited about, only to have it Bomb Completely*** in front of a new parent volunteer and be interrupted by a fire drill**** and subsequent malfunctioning fire alarm*****. Foreget a major part of your homework for grad class at home.
*Suppressing tears
** Various expletives (to myself of course)
*** Snapping at kids when it's not their fault
****More expletives (under breath)
*****Really? Laughable at this point
******Suck it up and deal.
I mean, everyone has days like this. No matter how long you've been doing something or how prepared you think you are... stuff's gonna go wrong. Stuff that is your fault (probably the most frustrating) and stuff that you can't control (the most annoying).
This post is not necessarily an advice post, but really, I just needed to vent. But you know what else? As I gain more and more life experience, I realize how quickly days like this will pass and I will be 99% likely to completely forget it. So, I have learned to try to focus on the good things that happened today.
Woke up to a clean apartment because the cleaning lady that my landlord pays for came yesterday. Listened to my favorite cheesy Christmas songs on my extra-short-today commute to work. Got compliments from teachers about a project I just put on display in the library. Realize the clay did NOT explode in the kiln like everyone was saying it would. Made my 4th graders laugh and smile. Got hugs from 1st graders. Found plenty of goodies to eat for lunch in the teachers' lounge. Got out of an afternoon obligation that gave me the much needed time to recover from my lesson that Bombed Completely. Got to vent about everything on my blog. Eat pizza leftovers for dinner. Catch up on the DVR. Get 8 hours of sleep and see if tomorrow is any better.
:)
Thursday, December 15, 2011
Thursday, December 8, 2011
"When You're Finished..." 3rd-6th Grades
As I mentioned in a previous post, I like to have consistent activities to engage students when they are finished early with their work. For Kindergarten though 2nd graders, I have "Options" centers. The older kids require a little more to keep them engaged, so I have them make "sketchbooks" at the beginning of the year.
I am saying "sketchbooks" in quotation marks, because I am not having the students use them in the traditional artist sketchbook way. (I know, I know, I should be calling them something else... maybe next year!) Sketchbooks in my classroom are a simple book consisting of a 12x18 piece of white paper folded in half, my ARTIST page, a Table of Contents, and ten blank pieces of copy paper... all stapled together.
I introduce sketchbooks at the beginning of the year, and I have a different lesson for each grade level to complete as the cover. Here are some examples of actual student covers:


And like I said, the rest of the pages in the sketchbook are just blank, and I expect kids to use the front and back of both. I use copy paper since it is easier to staple through.
BTW... this is how I store mine (big homemade class folders within each drawer):

I am saying "sketchbooks" in quotation marks, because I am not having the students use them in the traditional artist sketchbook way. (I know, I know, I should be calling them something else... maybe next year!) Sketchbooks in my classroom are a simple book consisting of a 12x18 piece of white paper folded in half, my ARTIST page, a Table of Contents, and ten blank pieces of copy paper... all stapled together.
I introduce sketchbooks at the beginning of the year, and I have a different lesson for each grade level to complete as the cover. Here are some examples of actual student covers:


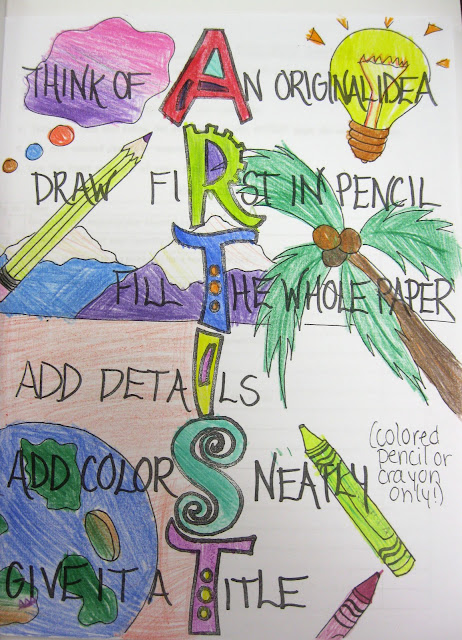
The first page of the sketchbook is what I call the ARTIST page. It is an acrostic of my criteria for making a succesful creative drawing. After a student completes a drawing, he or she checks it against the ARTIST page. If they meet all the criteria, I will sign off in the Table of Contents' approval column and will enter them in the contest to have that drawing shown on the morning announcements. I pick about 5-10 of those drawings every quarter, and they are featured in a slide show prior to the morning announcements.
Here is the ARTIST page (a student's half-colored-in version):

The Table of Contents contains 10 creative ideas that I have for them that relate to each grade level's "big idea". It also has 10 blank spaces for students to write their own ideas.

And like I said, the rest of the pages in the sketchbook are just blank, and I expect kids to use the front and back of both. I use copy paper since it is easier to staple through.
BTW... this is how I store mine (big homemade class folders within each drawer):

Friday, November 11, 2011
Teaching Students (or yourself) How to Begin a Coil Basket
A few years ago, before I was teaching in my current district, I decided that I wanted to try to teach 7th graders how to do coil basket weavings. I thought they looked really cool! The only problem...? I had to teach myself first. I tried following a few different sets of directions that I found on the internet, but none of them were thorough enough. They either had too many words and not enough pictures, or too many pictures and not enough written instruction. I quickly became frustrated and gave up.
When I found out that my new district requires us to teach coil basket weaving to our 6th graders, I was immediately filled with dread. Luckily, I had a great mentor who was able to teach me how to do it. I practiced and practiced so that I would be thoroughly prepared to teach my students.
But no amount of practice on my end would help alleviate their confusion in starting this project! Introducing a coil basket weaving is extremely frustrating for all... I even had a few kids in tears- kids who weren't used to "not getting" something on the first try. Remembering my struggles the first time I tried to learn, I decided to make a video that has just the right amount of imagery and text (at least in my opinion). I plan on showing this short PhotoStory to my 6th graders before we begin, in order to set the stage for the process, and then again as we are a few steps in, in order to reinforce the process.
Thursday, November 3, 2011
"When You're Finished..."
Let's face it. No matter how much we try to keep kids on the same page and try to encourage the best from every kid, some are going to finish more quickly than others. Lots of art teachers have them work right up until the end of class, but I find that too complicated and overwhelming for a lot of kids (and me). I try to make sure my students are focused on completing the objective(s) for that day, and then when they are finished (if finished early) they have a set routine to follow.
For my Kindergarten through second graders, I have the "Options" area.
 As you can see, each "Option" is stored in a box lid inside a desk (that way I can use the desk top space if needed). When K-2nd graders finish early, they may get out and select an option. Options are engaging, artistic activities that are also easy to clean up and put away. While I plan on changing the options from time to time to keep them interested, there are a few that are always captivating:
For my Kindergarten through second graders, I have the "Options" area.

- Free-draw paper/ white scrap paper. They will be especially engrossed with scrap paper if you also have stencils and photocopied/laminated pages from how-to-draw books. I know stencils aren't high-level art by any means... but they are great for keeping kids interested in something at least related to art!
- Coloring pages. Again, I know it's not the highest level thinking here. But, they are a great opportunity for these little ones to practice fine motor skills. I ordered a bunch of shape, design, pattern, and texture themed coloring books and just copied a bunch from those. The graphic shapes and details are very attractive to them.
- Shape and magnet games. If you look in the resources section of any art supply catalogue (I use Sax/ School Specialty) there are tons of art-related games. Two that I like are tangrams (shape puzzle) and architectural magnets. Just check it out. It might be an relatively expensive first-time purchase, but it should be reusable year after year.
- Modeling clay. Cheap modeling clay that doesn't dry out will keep them interested week after week! (Remember we are only talking about K-2, right now...) I used to put some clay tools out with it, but that just became something else to clean up. Now, they just get one little piece from one of the little plastic cups that I put in the box, and they come up with different ways to manipulate. They just need to make sure that all of that piece gets put back in a cup at the end of class.
Thursday, October 27, 2011
My Crazy Career Path
I am currently in the middle of my 6th year teaching elementary art. While that doesn't make me an expert by any means, I think that the unusual journey I've taken in my relatively short career has given me a broader experience (and therefore more to share) than you'd expect after only 6 years. Why? Because I have worked in 4 different schools, each in different districts, in two different states.
I studied Art Education at Penn State, and was basically told the entire time that I would not find a job teaching art in Pennsylvania. At least, not right out of college. So after graduation, I accepted a job in Ashburn, VA (30 miles outside DC) and lived and worked there for two years. Shortly after I'd moved there, though, I rekindled a college romance with a guy that lived in the suburbs of Philadelphia.
Thinking he might be "The One", I quit that job and moved out to live with him. The first year I lived in Pennsylvania, I had to take a job in New Jersey, which was about 45 minutes away, and it was only a long-term substitute position at a tiny, rural, K-8 school. (Middle school- ick.) The regular art teacher came back from maternity leave and despite fitting in really well, there wasn't room or need for both of us :(
Luckily, I found another job, also still in NJ, for the next school year. This time, it was a tenure-track position, meaning it was all mine! To this day, it was the best school and best classroom that I've had.
Halfway through that school year, I realized (albeit not quickly enough) that that boyfriend was not "The One". We broke up and I moved out, moving closer to that school near Princeton, NJ (yay for 10 minute commutes!).
I made awesome new friends, met a new boyfriend and created a new life in Princeton. I was actually really happy... which only made it that much more heartbreaking when NJ Governor Chris Christie decided he was going to attack the schools and cut almost a billion dollars from state funding for education. Guess who gets cut? Non-tenured, specials teachers. The other young Spanish, Music, and PE teachers in my school and I were all laid-off for no fault of our own.
I applied to 35 districts in New Jersey and only one other district out of state. Guess where I got the job? Out-of-state, back in Northern Virginia where I started (just one county closer to DC this time).
I am now in my second year in this district, and am once again really happy. Life is so crazy, but it can be so good too!
My Not-so-Eloquent Philosophy on Planning Lessons/Projects
In my relatively short teaching career, I have taught art in four different schools- each within a different district and two states! (More on the reasons why in a later post...) Although it was such a pain to start over at each school every time, it really helped broaden my vision of what different school environments and administration can be like.
Anyway... my point is, in only one of those schools was I required to actually type up my lesson plans. And even then, they were rarely read by any of my supervisors. So, I really am NOT in the habit of writing lesson plans. Now, I work in a very large "progressive" district where all of our lesson plans are already written... we just have to act them out... like reading a script for a play. While there are certainly many wonderful qualities to these lessons, I really love writing my own!
My first year of teaching, I was in a district that had absolutely no structure in terms of local standards and my principal was only concerned with me putting pretty things in the hallway. So, I got in the habit of coming up with all my lesson plans on my own. While this made for an extremely stressful and busy first year, it also set the tone for my overall philosophy about writing lesson plans...
Artists are creative people- duh- and obviously we chose this career because we want to use that creativity. I find ideas and inspiration for lessons all over the place... Current events, the weather, the school community, other artists, and especially from my students. I can't tell you how many times I have formed an entire lesson around something cool a student came up with that I thought was cool, so I wanted to share it with all of them! We are constantly hearing how art reflects life, so shouldn't our art lessons do the same? I appreciate the resources and ideas that my current distict gave me, it can feel limiting sometimes when I think that what I need to teach my 600 students fits neatly into a three ring binder.
Just a piece of advice though... whether you type up your lesson plans or not, always, always, always test them out yourself first. I'm sure most of you already know this anyway, because it only takes one or two times of not doing it, to learn your lesson. I also use my creation of the project as a basis for how long it will take the students. Typically, it takes students about 4x as long to make a project as it takes me to make the sample.
And finally... even though inspiration can come from anywhere, there are still those times that we just cannot think of something cool to do. In those cases, check out Artsonia. Artsonia's "museum" is absolutely loaded with lesson ideas from real art teachers. Just type in a key word if you have some idea of what you want to do. If not, just type the grade level into the search box and go from there. Some of my most popular lessons were inspired by these!
Thursday, October 20, 2011
Art Stars- Behavior Expectations

My Art Stars (Expectations) chart is something that I came up with after my first year of teaching. Throughout my first year, I kept a list of all the things that were not working in regards to students' behavior. By the end of the year, I realized that there were issues during every part of class, and that it probably had to do with my lack of clear expectations. This chart outlines my expectations for each part of class very clearly, and its format enables me to be consistent every time.
Students work together as a class to earn a star for each phase of class, from Arrival to Line-Up, and can earn up to ten stars each time they see me. (The stars a just little laminated pictures of star clip-art, that I stick on a piece of sticky tack that stays on the poster.) After they leave, I record their score and keep a running total on this chart:

At the end of each quarter, the class with the highest average gets a reward. I tend to change the reward every year. In the past, it has been a free-art day or picking their own seats. This year, they will win an extra art class, and they will get to vote on what they want to do in that class. (Don't ask me how I think I'm going to fit this into my schedule...) You might feel a little corny at first giving stars to the older kids... but I have even found this to be effective with middle schoolers! (Especially when choosing their own seats was the reward.) Now in its fifth year, it never ceases to amaze me how well students respond to this system.
*I made the poster by designing it first in Microsoft Word, and then had it enlarged to poster size. You can get really crafty, though, and just hand-make your own!
** Change the criterion in the table to make it work for your own procedures and expectations.
Happy Sponges- Quick and Effective Clean-Ups

Anyway, Happy and Sad Sponges are something I came up with after repeatedly reminding to students that they need to wring out their sponges before wiping down the table. (They have a tendency to think the-wetter-the-better, and end up dripping all over the floor and creating a lake on the table top... which ends up wasting a ton of time and paper towels in order to dry it up!) This idea alleviates that problem!
I have cut up sponges to smaller sizes so that I can have one for every child to use. When I am expecting class to be messy that day, I will take 3 minutes before the students come in to prepare the sponges. I dump all the sponges into the sink, rinse them out, and wring them out really well. These are "happy sponges" and they go in the plastic bin with the smiley face on it.
Whenever students need a sponge, my students know that they are to take one from the "happy" bin and that they are not allowed to add any water to it. If it gets too dirty or too dry to use anymore, students place it in the "sad" bin. (Eventually, sad sponges will need maintenance to made happy again.)
*I really only use this with Kindergarten through 3rd grade.
**I admit that this is not a completely perfect system in that it does require a lot of maintenance on my part, but I find it very helpful.
Subscribe to:
Comments (Atom)